Best Survival Shelter
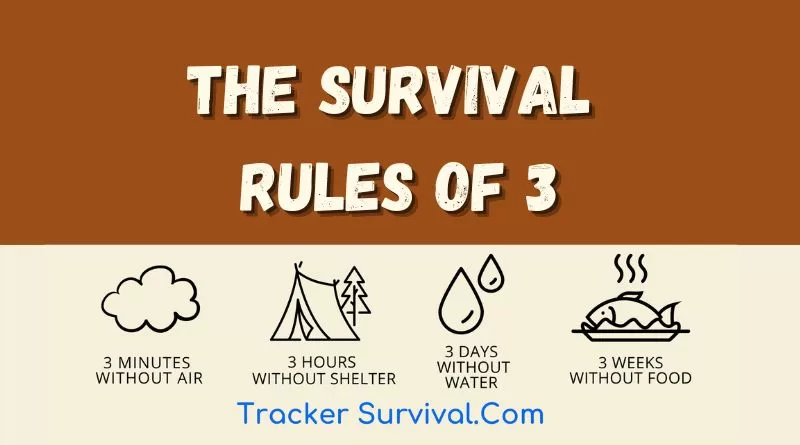
Exposure to inclement weather can be fatal in a surprisingly short time. The Survival Rule of 3’s states that a person can live ”3 Minutes without Air, 3 Hours without Shelter (in inclement weather), 3 Days without Water, and 3 Weeks without Food”. Having the skills to build a survival shelter is great, but the best thing a person can do is have a means of assembling a quick survival shelter with them at all times. It does not have to be fancy. Just a basic shelter from the elements.
The Best Place To Build A Survival Shelter
Location, location, location. Not just for businesses and real estate, but it also applies to finding the best place to build a survival shelter. A novice to the outdoors usually just throws up a shelter nearest to water, or natural resources (wood, food, etc).
An experienced woodsman knows location is important. Select a spot that is:
Not beside a body of water, rivers can flashflood, animals (bears, wolves, coyotes) may use the water as a source of drinking water, the ground may be damp.
Dry ground, if the ground is wet, damp, or dry, always make sure to put something between yourself and the ground, or elevate your bedding.
Flat ground is best, if there is no choice but to sleep on a slope, keep your head elevated and your feet pointing downhill.
Check overhead, for widow-makers or fool trees, dead branches, broken tree limbs, or detached tree tops that can fall and be fatal. The same applies to falling stones, rocks, and landslides.
Depending on the situation, you may want to be hidden or visible, for improved visibility choose high ground with sparse vegetation. If the aim is to be hidden, dense vegetation and low ground is best. Just remember that high ground is usually colder. But ravines and deep valleys are where cold settles at night.
Best Types Of Survival Shelters
There are a vast number of survival shelters built with materials that nature provides. All of the shelters listed below can be improved by using a tarp as waterproofing and as a windbreaker.
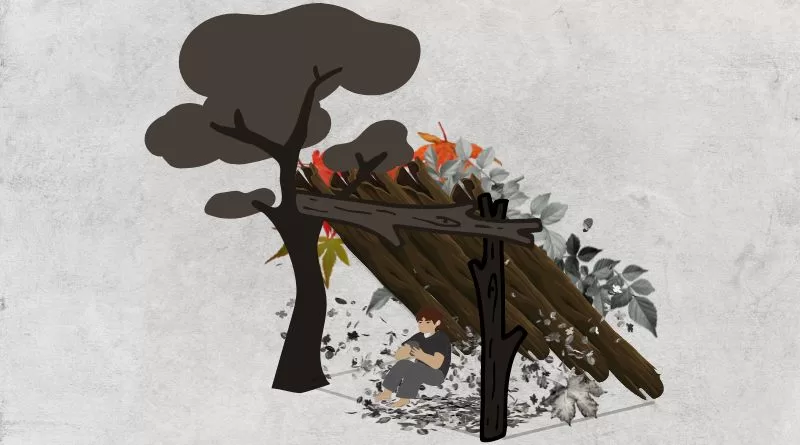
Lean-To
The classic lean-to is the simplest and quickest shelter to build in the outdoors. It is a very basic shelter that provides minimal protection against the elements.
Find 2 trees about 5 to 6 feet apart.
Cut a long pole about 7 to 8 feet long.
Tie the pole horizontally between the two trees about 4 feet off the ground.
Cut multiple poles and lean them against the main pole on three sides.
Leave one side open.
Cover with foliage to waterproof the lean-to. The more foliage you use the better insulated the lean-to will be.
Advantages:
Simple to build
Provides basic shelter
Can reflect the warmth of a fire, if the fire is properly placed
Disadvantage:
Provides limited protection from the wind
Provides limited protection from the rain
A-Frame
An A-frame shelter is as the name implies A shaped. It is a step up from the lean-to with 3 sides protected from the elements. Optimally the A-frame will taper off at the end, sealing the back end of the A-frame from the elements.
Build a tripod with 3 poles.
2 of the poles will be about 4 feet long and the 3rd pole will be about 7 to 8 feet long.
Gather wood to lean against the longer pole, covering both sides.
Pile foliage on top to waterproof the shelter. This will be a small shelter, designed for one person.
Advantages:
Simple to build
Provides more shelter from the elements than a Lean-to
Disadvantages:
Take more time and energy to build
Dug-out
A dug-out shelter is basically a shelter dug in the ground and covered with available materials such as sticks, bamboo, foliage, debris, tree bark, etc. To prevent rainwater from seeping down the sides of the dugout shelter, build a ridge around 6 to 8 inches high around the rim of the shelter. To prevent water seepage from the walls from flooding the shelter, slightly slope in the inner floor and build a shallow trench at the end of the slope to collect water. Always sleep off the ground.
This shelter is meant to be used long-term, as it takes a lot more time and effort to build than the ones listed above. Knowledge of the surrounding area is essential.
Advantages:
Can be a long-tern shelter
Excellent protection from the elements
Disadvantages:
Requires a lot of time to build
Requires more tools (shovel, pick-axe)
May get damp
Snow cave
In cold weather conditions, snow is a decent insulating material. Think of a snow cave as a makeshift igloo. But instead of building the igloo with blocks of cut ice, a snow cave is dug out of a snowdrift. While snow caves are fun to build, in a survival situation, any of the shelters above are a better alternative. Snow caves are very labor intensive to build, they require a LOT of snow, the snow has to be just right, too loose and the snow cave ceiling may collapse. Also, snow caves need ventilation holes which may be blocked in a snowstorm. The cons outweigh the pros, but if there are no other alternatives. Needs must.
Advantages:
Material is readily available in snowy areas
Excellent protection from wind and snow
Disadvantages:
Takes practice to build
May collapse
How To Build A Snow Cave
Build the snow shelter entrance and inside, dome-shaped, so the melting ice drips down the side.
The entrance should be about 3 feet high.
Once you have dug the entrance, start digging slightly upwards. You want the entrance to be lower than the inside of the snow cave.
Shape the internal dome-shaped ceiling first, making sure
that the ceiling is smooth.
The smaller the inside, the warmer it is.
Carefully poke a couple of holes in the sides of the ceiling for ventilation. And leave a trekking pole or long stick in one of the holes as an emergency vent just in case the vents get blocked by falling snow.
Safety tip:
Poke a stick outside the entrance of your snow shelter with a string attached.
Keep a shovel beside your sleeping bag.
Ramada
A Ramada is just 4 poles with a flat roof, used as shelter from the sun or light rain.
Advantages:
Protection from the sun
Cooling in hot weather
Simple to build
Disadvantages:
No protection from the wind
Limited protection from the rain (if it is windy)
The Best Survival Shelters
The best and most versatile portable survival shelters are built with a tarp. All of the shelters above can be more easily built or improved on, with a tarpaulin. If a tarp is unavailable, a survival poncho will do the trick. Although not as effective due to its substantially smaller size.
The Best Tarpaulin For Survival Shelter
A survival tarp needs to be lightweight, durable, pack small, and be waterproof.
Aqua Quest Defender, is the tarpaulin that all other tarps want to be. The gold standard of tarps with a price to match.
DD Tarp running in at a close second, DD Tarps have been used by bushcrafters and survivalists throughout Europe. (check out Chris Ryan on “Alone in the Wild” on Discovery Channel).
Budget Option
If cash is tight, have no fear, Amazon has a decent tarp affordably priced. While it is substantially bulkier it will get the job done. It lacks all the bells and whistles of the top-of-the-line models, but it is a solid option
Editors Choice
Mid-range Choice
Budget Option
The Best Poncho For A Survival Shelter
Ponchos are little tiny portable tarps that have a hole in the middle with a hood to insert your head. It is possible to built a very small one person survival shelter with a poncho. The best survival shelter that can be built with a poncho is an A-frame. However sleeping will have to be in a fetal position. If you have a candle (eg: tea light candle) and you are careful, you can place the candle under the poncho and it will provide a surprising amount of heat.
I am a fan of heavy canvas ponchos because I like the durability, and the fact that it is substantially more fire-resistant than ponchos made of synthetic fabrics.
I bought my favorite poncho at an army surplus store, it is a used military poncho, heavy canvas, a little small (170cm x 174cm), and tough as nails.
The disadvantage is its packing size and weight. That’s the reason I strap it on the outside of my bug-out bag.
The Mil-tec Poncho is the one I EDC , a pretty standard poncho, not the best quality out there, but also not the worst. The Mil-Tec Poncho is lightweight, compact, and reasonably priced.
Top Pick: The Helikon-Tex Poncho is the middle ground of the two above, having attributes of both, making it the top pick. It is durable and packs small. If it was a little bit resistant to campfire sparks it would be the perfect poncho.
Editors Choice
Canvas or Oilskin Ponchos, can be bought at army surplus stores or DIY at home.
Top Pick
Budget Option
Bivvys’, Tube Tents, And Making Do
Bivvys are a great emergency shelter option, almost like a tiny tent. They pack small, are lightweight, and are not overly expensive. The disadvantage with bivvies is condensation But if the situation is dire and shelter is needed. A bivvy could be a lifesaver.
Tube Tents made out of heavy-duty garbage bags are the poor man’s answer to the bivy. A heavy-duty garbage bag, used as a tent.
Summary:
The Survival Rule of 3s states that a person can survive a paltry 3 hours in inclement weather. The secret to surviving in the harshest of environments is the right shelter for the environment. Shelters build from natural materials such as wood, debris, or dug-out shelters take time and energy to build, but… They have certain advantages.
If build well, natural build shelters are usually sturdier than temporary shelters build using synthetic materials such as tents, tarpaulins, or poncho shelters.
Artificial shelters assembled using tarpaulins, ponchos, or bivvies are quick and simple to assemble, but flimsy. They do provide shelter from wind and rain. Check out “The Best Survival Shelters & Sleeping Bags“
The best survival shelter is built using both natural and synthetic materials, for example, a wooden A-frame, covered by a tarpaulin with foliage thrown on top for insulation.
Tents are great, but they are heavy and bulky taking up a lot of space. I built my survival shelters built using natural materials, a tarpaulin, or a blend of natural materials and the tarp.